
Zimbra là một bộ phần mềm email server mã nguồn mở bên cạnh phiên bản trả phí, có rất nhiều tính năng và sự ổn định, được nhiều doanh nghiệp, các nhà cung cấp dịch vụ email và các cơ quan Nhà nước tại Việt Nam sử dụng nhằm mục đích tối ưu chi phí và chủ động kiểm soát bảo mật thông tin.
Nhân dịp cài đặt máy chủ email Zimbra cho một công ty thực hiện vào 5/2021, viethoangit.com đăng tải hướng dẫn cài đặt để mọi người tham khảo, nếu thấy có sai sót nào mong mọi người bình luận bên dưới bài viết.
Trong quá trình cài đặt có tham khảo tài liệu Triển khai hệ thống Zimbra mô hình Multi-Server từ công ty Iway của anh Trương Anh Tuấn (iwayvietnam.com).
I. KẾ HOẠCH CÀI ĐẶT
Hướng dẫn này dành cho phiên bản Zimbra 8.8.15 collaboration open source edition cài đặt trên 1 máy chủ CentOS 8 (mô hình Single-Server).
Tên miền giả định được sử dụng trong bài viết là mail.viethoangit.com.
IP giả định là 192.168.16.235 (thay bằng IP public của bạn trong thực tế).
Thứ tự cài đặt:
Bước 1. Cài đặt hệ điều hành máy chủ CentOS 8
Bước 2. Cấu hình các bản ghi quan trọng: A, MX, SPF, PTR
Bước 3. Cài đặt Zimbra
Bước 4. Cấu hình bảo mật cho Zimbra: SSL, DKIM, DMARC
Bước 5. Các cấu hình bổ sung khác (tùy chọn)
Các bước từ bước 1 tới bước 4 là bắt buộc phải thực hiện để đảm bảo máy chủ email chạy đúng và an toàn, giảm thiểu nguy cơ bị virus, spam, phising…
Bước thứ 5 có thể thực hiện hoặc không tùy bạn, nó chỉ là một số cài đặt trong số rất nhiều những cài đặt khác có hướng dẫn ở trên internet tùy theo nhu cầu của người quản trị.
II. CHUẨN BỊ MÔI TRƯỜNG MÁY CHỦ
1. Đặt time zone:
timedatectl set-timezone Asia/Ho_Chi_Minh
2. Cài đặt RAM ảo:
sysctl vm.swappiness=5
Giá trị 5 nghĩa là RAM ảo chỉ sử dụng khi hết 95% RAM vật lý.
Check giá trị swappiness hiện tại:
cat /proc/sys/vm/swappiness
3. Cài đặt đồng bộ thời gian:
Trên CentOS 8 đã cài sẵn chrony
Để kiểm tra dùng lệnh: chronyc sources
4. Tắt dịch vụ postfix
systemctl stop postfix && systemctl disable postfix
5. Update hệ thống:
yum -y update
6. Đặt hostname:
hostnamectl set-hostname mail.viethoangit.com
Thêm hostname vào file /etc/hosts:
echo "192.168.16.235 mail.viethoangit.com mail" >> /etc/hosts
7. Tắt SELinux:
Tắt Selinux tạm thời để tránh lỗi khi cài đặt:
setenforce 0
Nếu trong quá trình sử dụng Zimbra phát sinh lỗi do Selinux thì bạn có thể tắt nó:
sed -i 's/SELINUX=enforcing/SELINUX=disabled/g' /etc/sysconfig/selinux
sed -i 's/SELINUX=enforcing/SELINUX=disabled/g' /etc/selinux/config
Kiểm tra SELinux bằng lệnh:
sestatus
Hiển thị “SELinux status: disabled” là thành công.
Bật lại selinux:
sed -i 's/SELINUX=disabled/SELINUX=enforcing/g' /etc/sysconfig/selinux
sed -i 's/SELINUX=disabled/SELINUX=enforcing/g' /etc/selinux/config
8. Cài đặt các gói hỗ trợ:
yum -y install unzip net-tools bind-utils sysstat openssh-clients perl-core libaio nmap-ncat libstdc++.so.6 wget
III. CẤU HÌNH CÁC BẢN GHI QUAN TRỌNG
1. Cấu hình bản ghi A và MX
Bản ghi có dạng
mail A 192.168.16.235
@ MX mail.viethoangit.com 10
Kiểm tra bản ghi MX bằng lệnh:
nslookup -type=mx viethoangit.com
hoặc
dig mx viethoangit.com +noall +answer
Hoặc kiểm tra qua link: https://mxtoolbox.com/
2. Cấu hình SPF (Sender Policy Framework)
Cấu hình bản ghi DNS:
- Tên máy chủ: @
- Loại: TXT
- Địa chỉ chuỗi dạng: v=spf1 +a +mx +ip4:192.168.16.235 ~all
Xem thêm hướng dẫn từ nhà cung cấp domain để biết chi tiết.
Kiểm tra SPF:
dig txt viethoangit.com +noall +answer
hoặc
nslookup -type=txt viethoangit.com
Nếu không thành công sẽ có dòng thông báo “does not designate”.
Hoặc kiểm tra qua link: https://mxtoolbox.com/
3. Cấu hình PTR record (rDNS)
Yêu cầu bên quản lý IP (nếu thuê tại data center) hoặc bên quản lý đường truyền (nếu thuê leased-line, ftth có IP tĩnh) trỏ PTR từ IP.
Ví dụ bản ghi có dạng:
192.168.16.235.in-addr. arpa IN PTR mail.viethoangit.com
Kiểm tra bản ghi PTR:
dig -x 192.168.16.235 +noall +answer
hoặc
nslookup -type=ptr 192.168.16.235
IV. CÀI ĐẶT ZIMBRA
1. Tải Zimbra:
cd /var/tmp
wget https://files.zimbra.com/downloads/8.8.15_GA/zcs-8.8.15_GA_3953.RHEL8_64.20200629025823.tgz
wget https://files.zimbra.com/downloads/8.8.15_GA/zcs-8.8.15_GA_3953.RHEL8_64.20200629025823.tgz.sha256
2. Giải nén Zimbra:
tar -xvzf zcs-8.8.15_GA_3953.RHEL8_64.20200629025823.tgz
3. Cài đặt Zimbra:
cd zcs-8.8.15_GA_3953.RHEL8_64.20200629025823
./install.sh
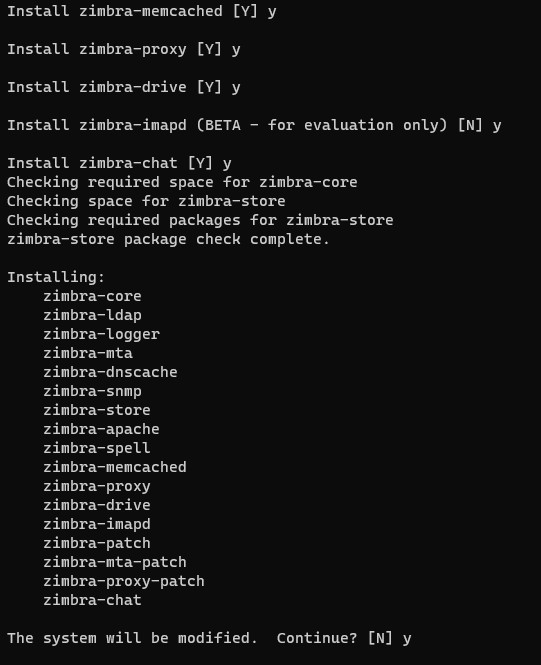
Chọn Y ở tất cả các tùy chọn:
(Chọn N ở “Install zimbra-dnscache” nếu muốn sử dụng server DNS riêng)
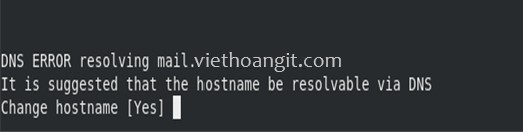
Đến đoạn thông báo về DNS error:
DNS ERROR resolving mail.viethoangit.comIt is suggested that the hostname be revolvable via DNSChange hostname? [Yes]
Đặt thành viethoangit.com (không có “email.”)
Đến đoạn thông báo về DNS error resolving MX:


Tiếp theo màn hình sẽ hiển thị như bên dưới:


Nhấn “r” để quay lại menu chính.
Nhấn “a” để chấp nhận các thay đổi.
Hệ thống sẽ tiến hành các thiết lập cuối, chờ một khoảng thời gian đến khi xuất hiện thông báo bên dưới là đã hoàn tất cài đặt:
Configuration complete - press return to exit
4. Tạo SSH key cho tài khoản zimbra:
Mặc định Zimbra sẽ tạo một tài khoản nhưng tắt login bằng mật khẩu, Zimbra Collaboration Suite kết nối với user này bằng ssh keys, cấu hình như sau:
# sudo -u zimbra -i
$ zmupdateauthkeys
Fetching key for webmail.example.com
Updating keys for webmail.example.com
Updating /opt/zimbra/.ssh/authorized_keys
5. Hiển thị thống kê trên Administration console
[root@mail ~]# /opt/zimbra/libexec/zmsyslogsetup
Terminal hiển thị:
updateSyslog: Updating /etc/rsyslog.conf...done.
6. Mở port trên firewall:
firewall-cmd --permanent --add-port={25,80,110,143,443,465,587,993,995, 2703,5222,5223,7071,8443,9071,24441}/tcp
firewall-cmd --permanent --add-port=24441/udp
firewall-cmd –reload
Kiểm tra:
firewall-cmd --list-all
7. Kiểm tra các dịch vụ của Zimbra
Đăng nhập vào tài khoản được cấp quyền chạy Zimbra:
su zimbra
Chạy lệnh kiểm tra:
zmcontrol status
8. Kiểm tra đăng nhập vào giao diện quản trị:
https://mail.viethoangit.com:7071/zimbraAdmin/
V. CẤU HÌNH BẢO MẬT CHO ZIMBRA
Lưu ý: Không gửi email trước khi hoàn tất phần cấu hình để tránh bị cho vào blacklist.
1. Bật tự động quét file đính kèm bằng ClamAV antivirus:
# su - zimbra
$ zmprov mcf zimbraAttachmentsScanURL clam://localhost:3310/
$ zmprov mcf zimbraAttachmentsScanEnabled TRUE
2. Cấu hình SSL
Hướng dẫn cấu hình SSL miễn phí: Letsencrypt ssl certificate
Cấu hình certbot-auto làm theo hướng dẫn tại:
https://wiki.zimbra.com/wiki/Installing_a_LetsEncrypt_SSL_Certificate
Nếu lỗi system không hỗ trợ certbot-auto thì làm theo các bước bên dưới như các hướng dẫn này:
https://certbot.eff.org/lets-encrypt/centosrhel8-other
https://snapcraft.io/docs/installing-snap-on-centos
Adding EPEL cho CentOS 8
$ sudo dnf install epel-release
$ sudo dnf upgrade
Installing snapd
$ sudo yum install snapd
Bật snapd socket:
$ sudo systemctl enable --now snapd.socket
Bật hỗ trợ classic snap:
$ sudo ln -s /var/lib/snapd/snap /snap
Đảm bảo phiên bản mới nhất của snapd:
sudo snap install core
sudo snap refresh core
Xóa certbot-auto và bất kỳ Certbot OS packages:
sudo yum remove certbot.
Cài đặt Certbot
sudo snap install --classic certbot
Warning: /var/lib/snapd/snap/bin was not found in your $PATH. If you've not restarted your session
since you installed snapd, try doing that. Please see https://forum.snapcraft.io/t/9469
for more details.
certbot 1.15.0 from Certbot Project (certbot-eff✓) installed
[root@mail letsencrypt]# ln -s /snap/bin/certbot /usr/bin/certbot
[root@mail letsencrypt]# certbot certonly --standalone
Saving debug log to /var/log/letsencrypt/letsencrypt.log
Plugins selected: Authenticator standalone, Installer None
Enter email address (used for urgent renewal and security notices)
(Enter 'c' to cancel): admin@viethoangit.com
- - - - - - - - - - - - - - - - - - - - - - - - - - - - - - - - - - - - - - - -
Please read the Terms of Service at
https://letsencrypt.org/documents/LE-SA-v1.2-November-15-2017.pdf. You must agree in order to register with the ACME server. Do you agree?
- - - - - - - - - - - - - - - - - - - - - - - - - - - - - - - - - - - - - - - -
(Y)es/(N)o: y
- - - - - - - - - - - - - - - - - - - - - - - - - - - - - - - - - - - - - - - -
Would you be willing, once your first certificate is successfully issued, to
share your email address with the Electronic Frontier Foundation, a founding
partner of the Let's Encrypt project and the non-profit organization that
develops Certbot? We'd like to send you email about our work encrypting the web,
EFF news, campaigns, and ways to support digital freedom.
- - - - - - - - - - - - - - - - - - - - - - - - - - - - - - - - - - - - - - - -
(Y)es/(N)o: n
Account registered.
Please enter in your domain name(s) (comma and/or space separated) (Enter 'c' to cancel): mail.viethoangit.com
Requesting a certificate for mail.viethoangit.com
Performing the following challenges:
http-01 challenge for mail.viethoangit.com
Waiting for verification...
Cleaning up challenges
IMPORTANT NOTES:
- Congratulations! Your certificate and chain have been saved at:
/etc/letsencrypt/live/mail.viethoangit.com/fullchain.pem
Your key file has been saved at:
/etc/letsencrypt/live/mail.viethoangit.com/privkey.pem
Your certificate will expire on 2021-09-09. To obtain a new or tweaked version of this certificate in the future, simply run certbot again. To non-interactively renew *all* of your certificates, run "certbot renew"
- If you like Certbot, please consider supporting our work by:
Donating to ISRG / Let's Encrypt: https://letsencrypt.org/donate
Donating to EFF: https://eff.org/donate-le
Chuẩn bị cho Certbot command
Thực thi lệnh dưới để đảm bảo cerbot command có thể chạy
sudo ln -s /snap/bin/certbot /usr/bin/certbot
Chạy Certbot
Trường hợp không chạy web server
sudo certbot certonly –standalone
Trường hợp web server đang chạy:
sudo certbot certonly --webroot
Important Note:
To use the webroot plugin, your server must be configured to serve files from hidden directories. If /.well-known is treated specially by your webserver configuration, you might need to modify the configuration to ensure that files inside /.well-known/acme-challenge are served by the webserver.
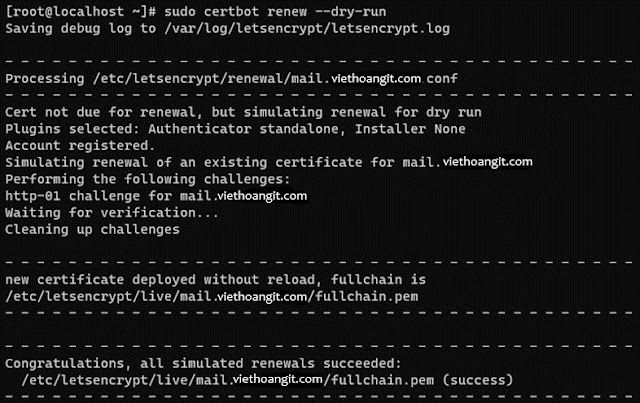
Thử nghiệm gia hạn tự động
Các gói Certbot trên hệ thống của bạn đi kèm với cron job hoặc systemd timer sẽ tự động gia hạn chứng chỉ của bạn trước khi chúng hết hạn. Bạn sẽ không cần phải chạy lại Certbot, trừ khi bạn thay đổi cấu hình của mình. Bạn có thể kiểm tra tính năng gia hạn tự động cho các chứng chỉ của mình bằng cách chạy lệnh sau:
sudo certbot renew --dry-run
Lệnh gia hạn certbot được cài đặt ở một trong các vị trí sau:
/etc/crontab/
/etc/cron.*/*
systemctl list-timers
Phần này ví dụ về renew khi có webserver HAProxy trên cùng máy chủ:
If you needed to stop your webserver to run Certbot, you'll want to add hook scripts to stop and start your webserver automatically. For example, if your webserver is HAProxy, run the following commands:
sudo sh -c 'printf "#!/bin/sh\nservice haproxy stop\n" > /etc/letsencrypt/renewal-hooks/pre/haproxy.sh'
sudo sh -c 'printf "#!/bin/sh\nservice haproxy start\n" > /etc/letsencrypt/renewal-hooks/post/haproxy.sh'
sudo chmod 755 /etc/letsencrypt/renewal-hooks/pre/haproxy.sh
sudo chmod 755 /etc/letsencrypt/renewal-hooks/post/haproxy.sh
Xây dựng CA trung gian thích hợp cộng với Root CA
Let's Encrypt gần như hoàn hảo, nhưng trong quá trình tạo tệp, họ chỉ thêm tệp chain.pem mà không cần root CA. Bạn phải sử dụng IdenTrust root Certificate và hợp nhất nó sau chain.pem
Copy chuỗi kí tự tại link này: https://letsencrypt.org/certs/trustid-x3-root.pem.txt
Dán vào hàng cuối cùng của tệp chain.pem tại đường dẫn:
/opt/zimbra/ssl/letsencrypt/chain.pem
Verify your commercial certificate.
Copy thư mục Let's Encrypt /etc/letsencrypt/live/$domain vào /opt/zimbra/ssl/letsencrypt:
mkdir /opt/zimbra/ssl/letsencrypt
cp /etc/letsencrypt/live/mail.viethoangit.com/* /opt/zimbra/ssl/letsencrypt/
chown zimbra:zimbra /opt/zimbra/ssl/letsencrypt/*
ls -la /opt/zimbra/ssl/letsencrypt/
su zimbra
cd /opt/zimbra/ssl/letsencrypt/
/opt/zimbra/bin/zmcertmgr verifycrt comm privkey.pem cer
** Verifying 'cert.pem' against 'privkey.pem'
Certificate 'cert.pem' and private key 'privkey.pem' match.
** Verifying 'cert.pem' against 'chain.pem'
Valid certificate chain: cert.pem: OK
Deploy the new Let's Encrypt SSL certificate
Backup thư mục Zimbra SSL
cp -a /opt/zimbra/ssl/zimbra /opt/zimbra/ssl/zimbra.$(date "+%Y%m%d")
Copy the private key under Zimbra SSL path
Trước khi triển khai Chứng chỉ SSL, bạn cần di chuyển privkey.pem theo đường dẫn thương mại SSL Zimbra, như sau:
cp /opt/zimbra/ssl/letsencrypt/privkey.pem /opt/zimbra/ssl/zimbra/commercial/commercial.key
Deploy:
$ cd /opt/zimbra/ssl/letsencrypt/
[zimbra@mail letsencrypt]$ /opt/zimbra/bin/zmcertmgr deploycrt comm cert.pem chain.pem

Khởi động Zimbra sau đó vào website để kiểm tra xem SSL đã hoạt động hay chưa:
su zimbra
zmproxyctl start
zmmailboxdctl start
Kiểm tra chất lượng SSL
https://www.ssllabs.com/ssltest/
Điểm A+ là tốt.
Nếu chưa đạt điểm A+ thì có thể tối ưu theo gợi ý trong bài này:
https://zimico.vn/lam-cach-nao-de-dat-diem-a-cho-ssl-test-tren-zimbra/
3. Cấu hình DKIM
Login vào tài khoản Zimbra
su zimbra
Đăng ký khóa DKIM
[zimbra@mail root]$ /opt/zimbra/libexec/zmdkimkeyutil -a -d viethoangit.com
DKIM Data added to LDAP for domain viethoangit.com with selector F9202012-A733-11EB-9336-EE4F3EDFDAF2
Public signature to enter into DNS:
F9202012-A733-11EB-9336-EE4F3EDFDAF2._domainkey IN TXT ( "v=DKIM1; k=rsa; "
"p=MIIBIjANBgkqhkiG9w0BAQEFAAOCAQ8AMIIBCgKCAQEA4YUv3Obt2v/wEPkzQ1asRq0UgC+5/FrlZNLjj0MLTrM+PzdNzx0a+12LTTpcG3GIunpmFsBxUxZ3Ax969q0thqUerRe4To/dpTc+pOFr21yimV7RXL4xQxDH1f1qBYoBGj4sJqeQqLNDQmI3ZLf8CFGa+exkh8uiDgbUg8b3BqeooizoL1X7dRI9tuioxvkILubCncKDvHTtIR"
"PpulJDOCvIYJLB7WJK2sPqo0FXd3gfyrG2QJcshsHBaAxDF0iZnCoaFq4fJCDHcj6e79WBjA9IZpbw1KwO8+JPdLf2N/JqC3AtyfbNRLFhbYKNYyyLZXhDIRxRSAHLJ97wdY/oFwIDAQAB" ) ; ----- DKIM key F9202012-A733-11EB-9336-EE4F3EDFDAF2

Tạo bản ghi trên DNS của tên miền:
Host record: F9202012-A733-11EB-9336-EE4F3EDFDAF2._domainkey
Type: TXT
Value:
v=DKIM1; k=rsa; p=MIIBIjANBgkqhkiG9w0BAQEFAAOCAQ8AMIIBCgKCAQEA4YUv3Obt2v/wEPkzQ1asRq0UgC+5/FrlZNLjj0MLTrM+PzdNzx0a+12LTTpcG3GIunpmFsBxUxZ3Ax969q0thqUerRe4To/dpTc+pOFr21yimV7RXL4xQxDH1f1qBYoBGj4sJqeQqLNDQmI3ZLf8CFGa+exkh8uiDgbUg8b3BqeooizoL1X7dRI9tuioxvkILubCncKDvHTtIRPpulJDOCvIYJLB7WJK2sPqo0FXd3gfyrG2QJcshsHBaAxDF0iZnCoaFq4fJCDHcj6e79WBjA9IZpbw1KwO8+JPdLf2N/JqC3AtyfbNRLFhbYKNYyyLZXhDIRxRSAHLJ97wdY/oFwIDAQAB
Lưu ý: xóa bỏ đấu “ (ngoặc kép) và khoảng trắng giữa 2 đoạn mã.
Check DKIM record
Cú pháp: dig txt selector._domainkey.domain
dig txt F9202012-A733-11EB-9336-EE4F3EDFDAF2._domainkey.viethoangit.com +noall +answer
hoặc
nslookup -type=txt F9202012-A733-11EB-9336-EE4F3EDFDAF2._domainkey.viethoangit.com
Hoặc kiểm tra online tại các link:
http://dkimvalidator.com
http://dkimcore.org/tools/keycheck.html
https://mxtoolbox.com/dkim.aspx
4. Cấu hình DMARC

Ví dụ mẫu DMARC:
Host record: _dmarc
Type: TXT
Value:
v=DMARC1;
p=quarantine; rua=mailto:admin@viethoangit.com;
ruf=mailto:admin@viethoangit.com; sp=quarantine
DMARC này có policy là quarantine. Tất cả các email không thỏa mãn điều kiện kiểm tra DKIM, SPF sẽ bị reject và gửi báo cáo về cho admin@viethoangit.com.
Lưu ý chỉ sử dụng _dmarc (không có dấu chấm (.) phía sau) trong DNS record. (Việc này tùy vào nhà cung cấp dịch vụ tên miền cho bạn quy định, vui lòng liên hệ với họ để được hướng dẫn).
Kiểm tra:
dig txt _dmarc.viethoangit.com +noall +answer
hoặc
nslookup -type=txt _dmarc.viethoangit.com
hoặc
Sau khi đã thiết lập xong có thể gửi mail đến gmail để kiểm tra. Xem trong phần show original sẽ báo PASS cho SPF, DKIM và DMARC.
Hoặc kiểm tra trên https://mxtoolbox.com
Ghi chú: Sau khi đã cấu hình đầy đủ DKIM, DMARC, có thể dùng Mail Tester (www.mail-tester.com) để kiểm tra. Gửi mail đến địa chỉ mail được chỉ định đang hiển thị trên trang web sau đó click và nút check, bạn sẽ biết điểm đánh giá, thường thì hệ thống cần đạt từ 8,5-10 điểm.
VI. CÁC CẤU HÌNH KHÁC (tùy chọn)
1. Cấu hình Antispam bổ sung
1. 1. Customizing SpamAssassin
Automatic rule updates
$ zmlocalconfig antispam_enable_rule_updates
antispam_enable_rule_updates = false
$ zmlocalconfig antispam_enable_restarts
antispam_enable_restarts = false
$ zmlocalconfig -e antispam_enable_rule_updates=true
$ zmlocalconfig -e antispam_enable_restarts=true
Automatic rule compilation
$ zmlocalconfig -e antispam_enable_rule_compilation=true
$ zmamavisdctl restart
$ zmmtactl restart
1. 2. Customizing Postfix
zmprov ms mail.viethoangit.com +zimbraMtaRestriction reject_unknown_reverse_client_hostname
1. 3. SpamAssassin Tweaks via the Commandline
Increase Amavis's Log Level
zmprov mcf zimbraAmavisLogLevel 2
Put Amavis's Temp Dir on a RAM Disk
zmamavisdctl stop
mount -t tmpfs -o size=1024m tmpfs /opt/zimbra/data/amavisd/tmp
Kiểm tra: mount | grep "tmpfs"
Auto-mount:
vi /etc/fstab
Chèn dòng bên dưới vào file:
tmpfs /opt/zimbra/data/amavisd/tmp tmpfs defaults,noexec,nodev,nosuid,size=1024m,mode=750,uid=zimbra,gid=zimbra 0 0
1. 4. Enable DCC
yum -y install gcc
mkdir -p /opt/zimbra/dcc-2.3.168
chown zimbra:zimbra /opt/zimbra/dcc-2.3.168
cd /opt/zimbra;ln -s dcc-2.3.168 dcc
su zimbra
cd /tmp
mkdir dcc
wget https://www.dcc-servers.net/dcc/source/dcc.tar.Z
tar xfz dcc.tar.Z
cd dcc-2.3.168
./configure --homedir=/opt/zimbra/dcc-2.3.168 \--disable-sys-inst --with-uid=zimbra --disable-server \--disable-dccifd --disable-dccm \--with-updatedcc_pfile=/opt/zimbra/data/dcc \--with-rundir=/opt/zimbra/data/dcc/run \--bindir=/opt/zimbra/dcc-2.3.168/bin
make
make install
cd /opt/zimbra/data
mkdir -p dcc/run
Update /opt/zimbra/data/spamassassin/localrules/sauser.cf
use_dcc 2
dcc_path /opt/zimbra/dcc/bin/dccproc
Restart Amavis
zmamavisdctl restart
2. Giới hạn gửi nhận email với Policyd
Ghi chú: Các bạn nên làm theo hướng dẫn mới hơn có trên Zimbra Wiki tại link: https://wiki.zimbra.com/wiki/CBPolicyd_with_Zimbra_MySQL (Setting up CBPolicyd with Zimbra MySQL)
Dưới đây là hướng dẫn làm theo tài liệu trên blog có tại link bên dưới mà tôi đã thực hiện:
https://blog.zimbra.com/2020/03/2-3-zimbra-open-core-series-rate-limiting-email-with-policyd/
Tải script
wget https://raw.githubusercontent.com/Zimbra-Community/zimbra-tools/
master/cbpolicyd.sh -O /tmp/cbpolicyd.sh
Cho phép thực thi
chmod +rx /tmp/cbpolicyd.sh
Chạy script
./tmp/cbpolicyd.sh
Bật và khởi động lại
su zimbra
zmprov ms mail.viethoangit.com +zimbraServiceEnabled cbpolicyd
zmprov ms mail.viethoangit.com zimbraCBPolicydQuotasEnabled TRUE
zmmtactl restart && zmcbpolicydctl start
Mặc định, script cài đặt sẽ thiết lập chính sách cho phép:
– Hạn chế bất kỳ người gửi nào chỉ được phép gửi tối đa 100 email mỗi 60 giây. Qúa số lượng này các email sẽ bị deferred.
– Hạn chế người dùng chỉ có thể nhận tối đa 125 email mỗi 60 giây. Qúa số lượng này sẽ bị chặn (reject).
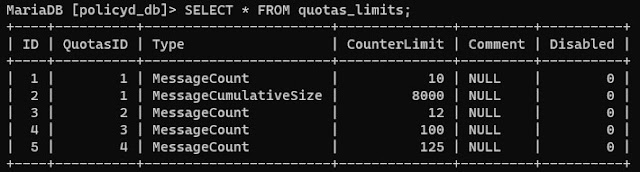
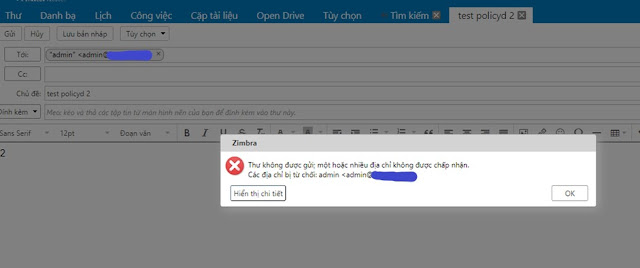
Để kiểm tra cấu hình, hãy tạm thời thay đổi tỷ lệ email gửi đi thành một con số thấp hơn, để bạn có thể quan sát xem email có bị từ chối hay không:
/opt/zimbra/bin/mysql policyd_db
SELECT * FROM quotas_limits;
UPDATE quotas_limits SET CounterLimit = 1 WHERE QuotasID = 3;
Xem cấu hình mặc định:
zmlocalconfig | grep -i cbpolicy
Xem log policyd tại:
/opt/zimbra/log/cbpolicyd.log
3. Sửa lỗi phân quyền
su - zimbra -c 'zmcontrol stop'
/opt/zimbra/libexec/zmfixperms -v -e
su - zimbra -c 'zmcontrol start'
4. Tài liệu tham chiếu
https://zimbra.github.io/installguides/latest/single.html
https://wiki.zimbra.com/wiki/Installing_a_LetsEncrypt_SSL_Certificate
https://wiki.zimbra.com/wiki/Configuring_for_DKIM_Signing
https://wiki.zimbra.com/wiki/Best_Practices_on_Email_Protection:_SPF,_DKIM_and_DMARC
https://wiki.zimbra.com/wiki/Category:ZCS_8.8
https://wiki.zimbra.com/wiki/CBPolicyd_with_Zimbra_MySQL
Bạn ơi, nếu sau khi cài đặt hoàn chỉnh, hệ thống hoạt động bình thường mà mình có nhu cầu đổi Public IP thì làm như thế nào vậy bạn?
Trả lờiXóa